A couple of months ago we released our “Rifle Optics” Blog. In that we said we would be breaking down some of our builds and why we choose certain optics, lights, triggers and everything else! The end goal of this blog is to help you figure out what you should do with your builds. For this blog we will be going over my personal Ballistic Advantage 13.7” build.
Context:
First off, I just want to preface that there is no such thing as a Do-It-All Rifle. That simply just doesn’t exist. However you could build a rifle that fits MOST of your needs. Personally, I wanted a rifle that I could use for "CQB" (home defense) and reach out at a distance effectively. I had previously built an 10.5” AR-15 before but was looking for something a little different. At the same time I didn’t want a standard 16” rifle because that felt simple, even boring if we are being honest. So far this 13.7 has been much more enjoyable to shoot and the accuracy gains have been noticeable.
The Breakdown:
So let’s start with the guts of the rifle. I bought the lower and lower parts kit from Palmetto State Armory. I then upgraded the trigger and put in an ALG Defensive Advanced Combat Trigger. For $80 this is an upgrade from the standard Mil-Spec trigger it came with without breaking the bank.
The Stock is a CTR stock from Magpul. At the end of the day it’s a stock, nothing special to say really.
This rifle build currently has a mil-spec buffer with an H2 Buffer weight. You are looking for your rifle to be ejecting casings at 3-4 O’clock. This will reduce the wear and tear on the BCG and make the recoil impulse softer. Most AR-15’s out of the box are over gassed so you should test to find out what works best for you!
I added a Magpul B.A.D Lever and Radian Raptor charging handle to assist in reloads and malfunctions. If the Radian is a little too much for you then most ambidextrous charging handles will be an upgrade. The B.A.D Lever however is a must in my opinion. Not only does it make reloads easier but it assists with locking the bolt to rear when you encounter malfunctions.
While we are on the subject of easier reloads I have added an HRF Concepts magwell. This is not a must but it certainly isn’t going to hinder anything so I felt it was what this gun needed.
For my pistol grip I am running a Driven Arms Co. Ultralight Compact Grip. I don’t have very large hands so I wanted a grip that was smaller than the standard Magpul grip. It also makes storing in a bag much easier because it is the same length as a 20rd PMag. It’s the little things.
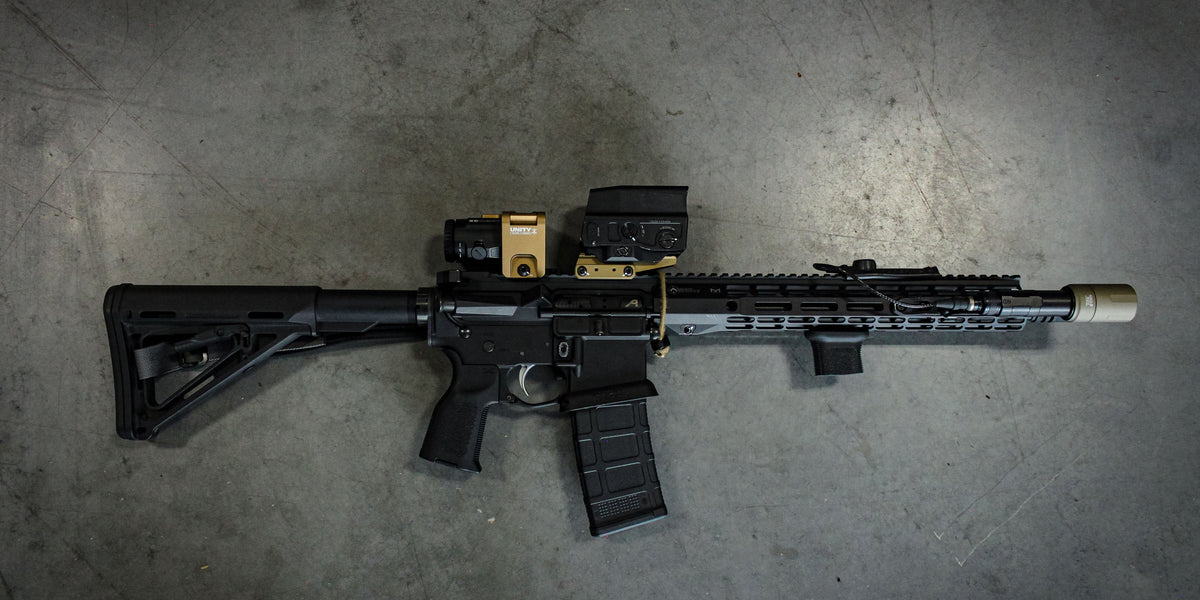
The upper is a 13.7” Ballistic Advantage with the standard A2 flash hider. I went with the Ballistic Advantage Upper because of the Sub MOA guarantee (with match ammunition). Combine that with the price and you have a quality upper that will out shoot you 10/10 times.

For optics I went with the Vortex UH-1 Gen 1 with the Vortex Micro 3x on Unity Tactical Mounts. Since I wanted to be able to shoot out to 500yds a Magnifier was a must on this build. I didn’t have the budget for a Eotech sight or magnifier so I hopped on Ebay and found these for cheap (Yes, you can find deals on Ebay). I went with the Unity Tactical mount for 2 reasons. I hated the idea of my magnifier hanging off the side when it wasn’t in use, which the Unity Mount solves with its ability to FTC (Flip to Center). Secondly, I wanted something taller than a lower 3rd. Can you make a lower 3rd mount work? Yes, of course,and in some cases it is better, but I was looking for something different. I heard a lot of mixed opinions on these mounts but they solved my core issues, plus they look cool and that means something right?
I am running the BCM Gunfighter Vertical Grip. A grip like this is optional and not required but for how cheap it is and the benefits I get, I left it on. I opted to cut this one down because I found that it was a little long for no reason. So I took it to the hacksaw and sanded it down.
For the sling I went with the T-Rex Arms sling on this build. The reason being is I wanted something with a quick adjust and the ability to fold up and stow on the side when not in use. With it is folded up you can still run the gun which I love. Most slings on the market will work great but I recommend buying a sling that has a quick adjust feature. This is a very useful feature and one that I find myself using a lot.

For the light I ended up going with the Cloud Defensive Rein Legacy Body with the 3.0 head mounted on a T-Rex Arms lightbar to push it out past the rail. This is attached to a SureFire Scout UE-SR07 TailCap and Pressure pad. This light has some serious power which is what I was looking for. Plus it is a great bang for the buck for how much output you are getting!
Conclusion:
The great thing about your AR is that it’s YOUR AR. Don’t copy people just because you saw them on Instagram/Facebook or your buddy told you he’s found the next best thing. Ask yourself why you are building this rifle and then build it accordingly. This build took years to come together because I kept changing what I wanted but we got there in the end! Along the way I watched countless videos, read countless articles and talked to people about their thoughts on the products I was going to buy. I heard mixed reviews on just about everything but I felt like these products best filled my needs so I went for it. If you find out you don’t like it, sell it and buy something else. There isn’t a one size fits all solution.


